Showing posts with label Tidy Tuesday. Show all posts

Tuesday, July 16, 2013

Toaster Tray

Toaster Tray - kristalcoles.comIgnore the sad state of the toaster and bask in the glory of my clean counter!

Here's a couple of things you should know about me.  First, I hate clutter.  I can't stand to have things out on my counters.  Second, I have kids and, therefore, not too many "nice" things.  So, yeah, the toaster has seen better days but I refuse to waste money on a new one that will eventually, and likely quickly, meet the same fate.

Now my kids, on the other hand, seem to LOVE seeing things out on the counter.  All day, everyday throughout summer break I find my toaster out and accompanying crumbs everywhere.  I'm happy the kids are self-sufficient and feed themselves {mostly} but I realized they couldn't put the toaster away immediately because it needed to cool down.

Which brings me to the Toaster Tray.  I wanted a solution that would keep both the counter and my cupboard clean and clear of falling toast crumblets, keep little fingers from being burned, and provide cord control.

Sometimes the simplest solution is the best and this is the case here.  I LOVE Maruchan Ramen...for their boxes!  The kids eat plenty of it so I always have lots on hand and they are perfect for organizing.  For this project I  just cut the sides shorter, wrapped it in foil and that's it!  The cord fits in the box, the crumbs are contained, and the little ones grab the box instead of the hot metal sides.

Someday I will have "nice" things and when I do eventually upgrade to a new toaster I might consider making a cute wooden tray with handles but this totally does the trick for now.

Thursday, May 2, 2013

All's Fair in Love and War

I am in a war.  A war against germs and their allies: lazy kids.

Generally my kids are pretty good about doing their chores.  Especially since we started using myjobchart.com.  But this week they have all gotten a little apathetic about their duties.  Last night when I implored for the dishes to be done I heard a chorus of, "It's not fair!  [So and so] didn't do them on his/her day!"

Apparently it's 'fair' for me to look at them all day while I'm home and to have to cook around them, though.  Hmmm, guess I'll consider this battle lost.

So in an effort to be completely and totally FAIR this is what they get to do after school today:

Fair Dishes at kristalcoles.comAnd because I LOVE them all so much and would hate to be accused of spoiling them or making it 'unfair' by letting one fill the dishwasher and leaving no room for the others:


REALLY Fair Dishes at kristalcoles.com


I mean, afterall - I never had a dishwasher growing up.  So that seems fair, don't ya think?

Victory.

Tuesday, June 21, 2011

Neat Bedding

Ever try making a bunk bed?  How about a TRIPLE bunk bed?


It takes forever and it seemed to me that I would work up more of a sweat making the beds than working out.  I would end up looking very much like poor Alexander on his terrible, horrible, no good, very bad day.  And for what?  The next morning the only thing left on the beds with any semblance of order would be the fitted sheet.

So I thought to myself, "Why not give the top sheet and blanket fitted corners at the foot of the bed, too?"

An Internet search brought me HERE, where I learned I wasn't as clever as I had thought - someone had beat me to the idea!  However, seeing as I already had sheets and am capable of a *few* basic sewing skills I decided to make the inseparable sheets from what I already had - for the bunk beds and Elizabeth's bed.


The standard twin size comforter is way bigger than most bunk beds need and you wind up tucking in nearly a third of it.  I wanted my kids to be able to make their own beds without needing a forklift to raise the mattress and shove yards of blankets underneath.  So I cut it down, saved the extra fabric for some other projects, and used the removed binding to clean up the look of the new fitted corners.


The best part is: I don't have to make the beds anymore!  This made it so easy that the kids just have to pull up on the top, smooth it out, and they're done!

If you would like to make your own click HERE for a plethora of "how to" websites on making fitted sheets corners.  Don't forget to account for a body in the bed when taking measurements if you choose to do the inseparable version from above or if you cut your blanket/sheet smaller!!

Tuesday, May 31, 2011

Photo Organization

Did I forget to mention last summer that Sam made the city's Little League All-Star Team?!

Slugger Sam, #1

Or that Brandon was the tallest kid on his summer basketball team, maybe even the league?!

Brandon dominated rebounds in 2010

Or that Matthew was finally allowed to play a sport (we set a minimum age in our family for spending money on activities) this past winter?!

Matthew, #3 (he said he picked that number because he's boy #3 in our family)

Or how about that Elizabeth LOVES having the chance to be the boss of someone?

Meet Scout, the three year old chihuahua mix Santa rescued from the shelter

Well, since I forgot, it's a good thing I have a way to keep all those digital photos organized so I could mention them all!


Yep, good thing.  Now to be smart and get some way of protecting them.  Like an external hard drive.  Baby steps...baby steps.

Tuesday, May 10, 2011

Fit for a Princess

**Insert Royal Fanfare Here**

We finally have at least one room completed in our "new" {we've been here two years} home!


Elizabeth's princess bedroom.

When we were looking at this house I immediately pictured a castle mural around this window.  At the time the entire room was Smurf blue.  But I knew it would be just right for Matthew and Elizabeth.  It was one of those 'how I knew this was the house for us' moments.  Of course, we've now been here so long that Matthew has moved into the older boys' room, changing my plans of aged castles and dragons to turrets and princesses.


Every princess needs a canopy.

I've had my eye on this canopy ever since my first trip to the IKEA store five years ago.  And what princess wouldn't want a pink monogram higlighted with gold above her balcony?


I just love when so many colors and patterns actually work together!

These fabulous curtains and sheers also came from IKEA.  I don't think you can look at them and NOT be happy.  I love that they'll easily adapt to a more mature design when she grows out of fairy tales.


A little bit of the Smurf blue remains, but where it belongs...on Smurfs!

This collection is from when I lived in West Germany as a child.  They are not in mint condition.  It's not that sort of collection.  These are for playing with.  It makes me so happy to see my children enjoy something that brought me joy as a child {thanks for keeping them all those years, Mom}!  Perhaps when she gets married I will lend her one to carry in a hidden pocket to cover the somethings old, borrowed, and blue.


Creating the border

Apparently wallpaper is pretty hard to find.  Gone are the days of flipping through huge sample books.  Where have I been and when did that happen?!  I needed something to divide the pink and green and a chair rail was just too expensive.  I thought of just painting a white band but I didn't think that would look quite right.  And the few borders I could find were licensed cartoon characters.  No thanks.

Then, while I was once again staring down said pathetic options at my local Wal-Mart, an older gentlemanly employee came to my rescue and introduced me to wall paper glue.  He told me it would glue any paper to a wall.  That was all I needed to hear!  I found this gift wrap at a dollar store and bought three rolls, just in case. Turns out I only needed one.  Voila!  A border for less than a buck!  Imagine all the fun decals you could use this for!


"A home for everything, and everything in its place."

Everything has a place and she is so good about keeping it neat most of the time.  About two weeks ago she came to me and said, "Mom, I have too many toys.  I need to give some to other kids so they can play with them and so my room can be clean."  What five year old talks like that?  I love that girl!


Pictures of Christ, the LDS Salt Lake Temple, and our family.

"And they all lived happily ever after."  Well, at least that's what we're workings towards.  After all, isn't that the promise of a 'Forever Family'?  I painted this reminder and included these pictures to help remind Elizabeth that she has a divine nature and is truly the daughter of a King, a princess preparing for her 'happily ever after'

Tuesday, June 15, 2010

Knee-high to a . . .

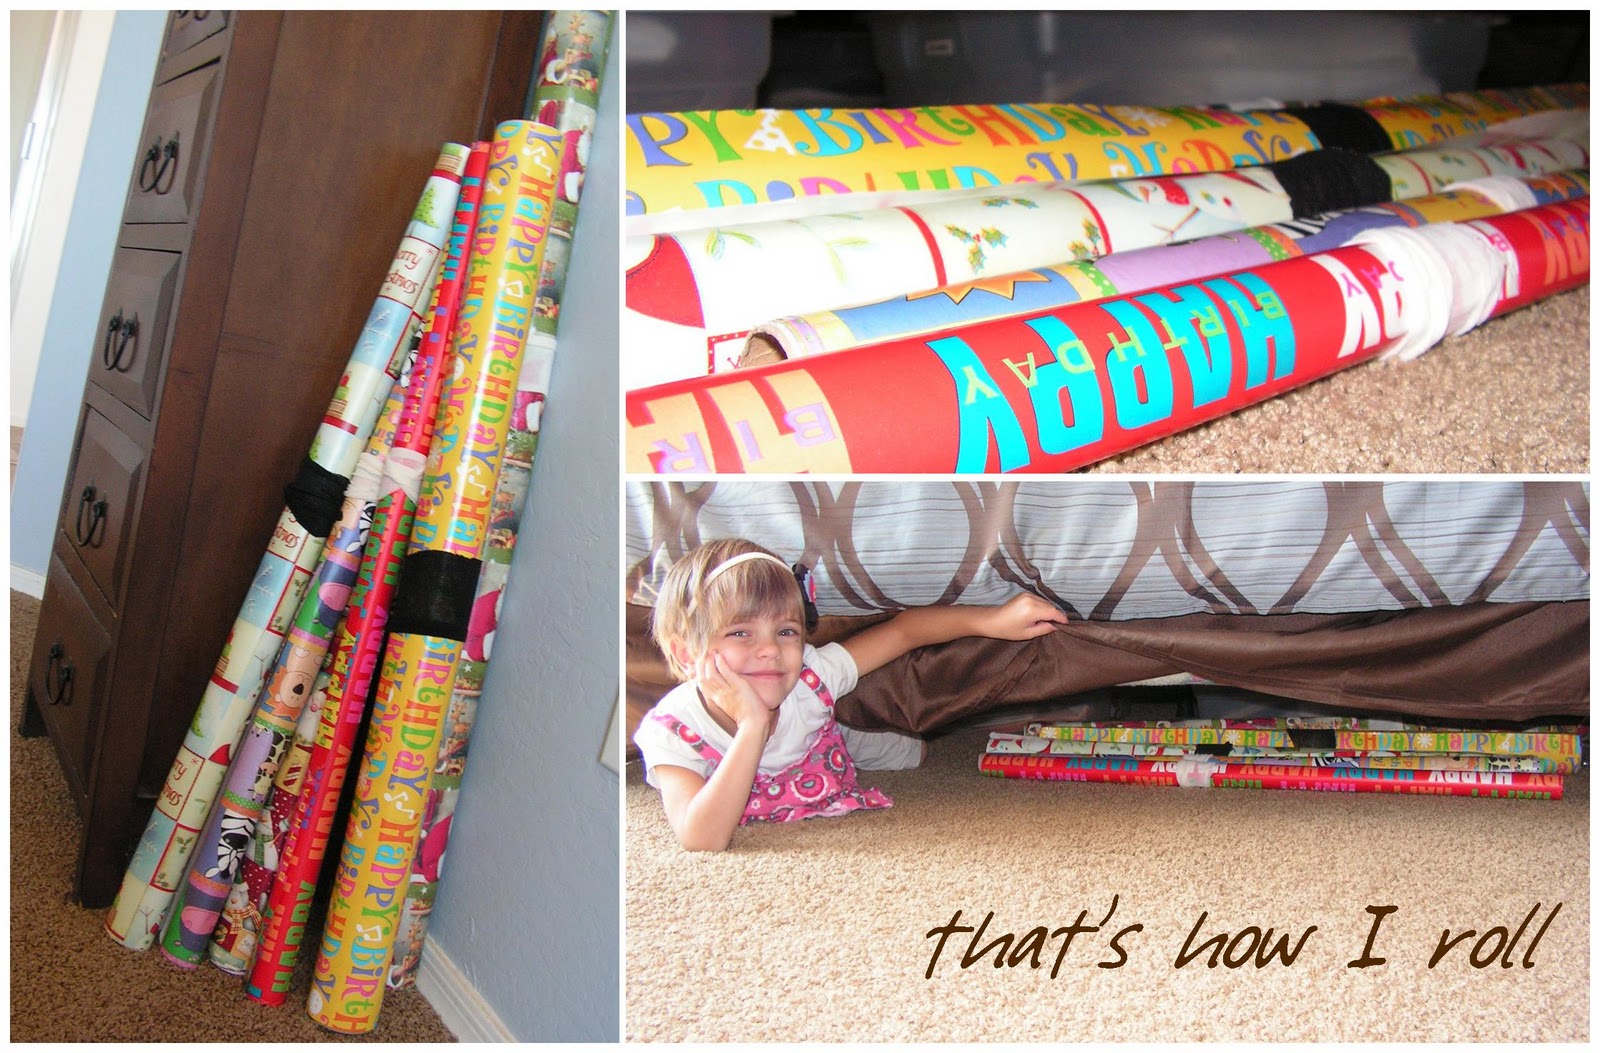
. . . gift wrap keeper.  Gotcha, didn't I?  You thought I was going to say grasshopper, huh?  Well, not so, my friends.

Have you got a stack of unruly wrapping paper somewhere in your home?


Forget about those fancy gift wrap storage containers.  I've tried them.  I like the idea of keeping dust off the paper, but inevitably my rolls would always be too long too fit in them.  Not to mention my paper would still unroll and tear.

I finally resigned myself to the fact that my specialty storage container wasn't working for me and sold it in our last garage sale.  I think it will finally be put to a good use; a woman bought it to use as a horse feed bucket!

So now what?  For $.33/pair I bought a few knee-highs from Wal-Mart and cut the bands off the tops.


Of course, if you want to be even more frugal use your old ones that have runs in them.  I would've recycled mine except I don't wear nylons.

Slide them over your gift wrap.  If needed, wrap the band around the roll twice to keep it secure.


Now your wrapping paper will stay nice and neat no matter where you put it!


Cliffhanger:  remember to save the rest of the knee-highs for another project coming soon!  Hint:  it is already pictured in this post . . .

Tuesday, June 8, 2010

Laundry Dots

I have three boys.  Usually it is obvious which little pair of shorts or undies belong to which boy.  But sometimes not so much.  Sometimes the size on the tag is worn off or the sizes are too close to tell apart without holding them up to one another.

While browsing around one of my favorites websites a few years ago I found this solution:


LaUnDrY DoTs!

Brandon (the oldest) gets one dot.  Sam (the "skunk in the middle") gets two.  And Matthew (the youngest boy) gets three.

O, laundry dots, why do I love thee?  Let me count the ways:
  1. I can fold BVD's by dots with ease
  2. I can pair socks by dots - that ROCKS! (put the dots on the bottom of the toe)
  3. I can hand down clothes by the lot by simply adding a little dot (This is my favorite! Why use dots instead of initials, names, or colors?  Because as your children grow out of clothes you can just add on another dot as you go down the line, rather than scribbling out that Sharpie® "B".  So your oldest gets one dot, next oldest - two, etc.  Get it?)
I'm sorry I can no longer find the page I discovered this gem at, but there is lots more to discover at

Tuesday, April 13, 2010

I ♥ BEVARA

My new favorite item in my kitchen is my set of BEVARA clips from IKEA.  I used to keep twist-ties to use but they were a pain to keep track of and the younger kids had trouble with them.  I use these clips on everything I can think of: frozen veggies, crackers, bagged cereal, sugar, half-used seasoning packets, to make a quick towel bib . . . you get the idea!

Tuesday, April 6, 2010

Customized Template


It's my 200th post and Tidy Tuesday so why not clean up and update the blog?  I'm still not sure it's exactly what I want yet, but if I fool around with it anymore today nothing else will get done.  Have fun looking around and let me know what you like/don't like.

Here's a quick tutorial for a more customizable Blogger template:
  • Log into your Blogger account.
  • Without logging out, go to http://www.draft.blogger.com/ .  You can check the "Make Blogger in Draft my default dashboard" option to come here directly in the future.


  • Go to the Layout page for your blog.  Click on Template Designer.


    • From here you can customize your blog in just about every way you can think of.  Be sure to click  the orange "APPLY TO BLOG" button in the upper right corner to save your new template.  You'll also notice that Blogger in Draft offers more widgets than regular Blogger does.  I chose the Watermark template by Josh Peterson with the birds option.
    To remove the birds watermark overlay and add your own:Choose an image, making sure the backgroud is transparent and save it as a .png file. 

    • Upload to http://www.photobucket.com/ or a similar photo hosting site.  Copy the Direct Link code for your image.

    • In Blogger or Blogger in Draft go to Layout > Edit HTML.

    • Using the F3 key find http://www.blogblog.com/1kt/watermark/body_overlay_birds.png .  It will be between ( and ).  There are two places this link occus right near each other.

    • Replace the above links with your image's Direct Link code, making sure to keep the ( and ) in place.

    • Preview your blog before saving to make sure all the codes are still correct and it looks the way you want (you may need to adjust your original image's size to get it just right.)

    • Make sure you save your changes.

    Let me know if you do this so I can see your beautiful new template!

    Tuesday, March 30, 2010

    Touch Up Paint & More

    I have been spending a lot of time painting the walls of my house lately. I’ve found that Ziploc’s extra-small bowls are a perfectly sized container to carry around while doing the edging. What I like even more is that I can leave the paint in them for touch ups!


    Dragging out the gallon {or worse, five gallon!} bucket of paint for a little touch up can be a pain. These see-through, air-tight bowls make the repair quick and easy.


    As a bonus, they have also solved my problem of finding a sink stopper {that actually fits and can easily be pulled out} for the garbage disposal.


    Or, if you’d rather just use them for food their one cup portions are perfect for calorie counting brown-paper-baggers.  Either way, I find them to be well worth the less than $3 I paid for a six pack!

    And no, I was not paid -- or even asked -- to review this product.  I just find them extremly useful and thought you might, too!

    Tuesday, March 23, 2010

    Go Green, Bleach It White


    I hate highly dislike kitchen sponges.  They are so gross to me.  Instead, I use these white bar rags and bar mops.  They are inexpensive (find them in the kitchen section of any Wal-Mart) and I can bleach them to use over and over again.  As you can see, I have a drawer in my kitchen just for them.  When rolled, everything stays nice and neat -- a tip that also works wonders for sock drawers.

    Tuesday, March 16, 2010

    Tidy Tuesday: "Short"comings

    Utilizing the top shelf in the kitchen cupboards can be an exercise in futility for those of us who are vertically challenged.  But the space need not go to waste...

    When this:
    just doesn't cut it...

    Reach for/with your kitchen tongs!

    Thursday, June 26, 2008

    The Great Garage Clean-Up

    BEFORE
    This was also before Grandpa visited and bought the boys 3 new bikes to add to the chaos! At one point we had 8 bikes, a jogging stroller/bike trailer, 2 Razor scooters, 1 electric scooter, 2 skateboards, and a pogo stick -- but no car -- in the garage! As you can see, the mess had taken over my supposed studio as well. It was time for a change!

    SHELVES

    OK, so those of you who know me well, know I love to organize. The first thing I did was make a to-scale map of the garage and the major pieces I already had and larger items that would be staying. What became immediately clear is that I did not have enough shelving, nor was I able to utilize my vertical space very effectively.

    We are renting this home, so any solutions would be temporary. Therefore the idea of spending very much on the 2-3 new shelving sets I would need did not sound too appealing. I also really needed to be able to keep my floor space for all those bicycles. The solution was to build and hang my own shelves. They were cheap enough that I could leave them for the next renter or I could take them with me if I want to when the time comes.


    I am very proud to say I built these shelves completely on my own! I navigated Home Depot with a 2 year old and in heels (by the way, this an excellent way to get all the associates and older customers to help you; you just look so out of place they think you must be helpless!) I had them cut the 4x8 sheets of plywood in half for me, but still had to rip off six more inches when I got home. I love my circular saw! I was even able to get Sam and the neighborhood boys to pass off some Cub Scout requirements by naming the tools and their functions, and then let them help screw in the brackets. Yes, I know, I AM SUPER-MOM!

    BATTLE OF THE BIKES
    First things first, we gave away all the boys' old bikes. I then decided that I wanted a bike rack that sits on the floor so the kids could just ride their bike in and park it. There are quite a few that can fit 2-4 bikes available online for $80 to $150 each. That is not my idea of affordable!

    I Googled homemade bike racks and discovered an awesome website for all things do-it-yourself HERE.
    That lead me to another site with blue prints for the bike rack you see in the pictures. That's right folks, I again schlepped my 2 year old to Home Depot, bought a bunch of PVC and in a few hours built myself two custom bikes racks for a total of $23, including tax!

    I think at this point my husband is thinking I'm pretty handy to have around and may very well be worth keeping ;P

    You can find the plans for this bike rack HERE (this link was updated 06/17/2010, when the new page opens, the plans are listed in the third column, fifth up from the bottom as "Truck Bed Bike Rack").


    A PLACE OF MY OWN

    I also gave away a lot of clothes that I had been storing. I figured that even if I have more boys, I will probably not want to dress them in the same stuff that we dressed our now almost 10 year old in! I limited myself to one bin of boy clothes and one bin of girl clothes. Once I did this I actually found I had space to create a zone just for me and my many projects.

    I love having a desk that I can keep all my sewing stuff set up at, but also still use for my art.

    On another wall just to the left is my favorite new piece! I found this set of lockers at a Goodwill months ago for only $20. I brought it home and cleaned it up. It now stores ALL my paints, brushes, backdrops, etc. I also love that I can lock the cubbies to keep the rats, I mean my lovely perfect children, out of my paint! I even have a locker labeled "Pyromania" for our matches and lighter fluid. If you're asking yourself why I would do that, you apparently haven't met my boys.

    Lastly, I have to say that I LOVE my LABEL MAKER! Everything in my garage is now labeled and will hopefully stay looking like this . . .


    Related Posts Plugin for WordPress, Blogger...